How to Enroll Device in Intune: A Complete Guide
Learn how to enroll devices in Microsoft Intune with our step-by-step guide covering manual, Autopilot, and GPO methods for corporate and BYOD assets.

Colin Reed
IT Expert and Content Writer
Last Updated

Managing all the devices your team uses can feel like herding cats. You have company-owned laptops, personal phones for work email (the whole BYOD thing), and everything in between. Keeping it all secure and running properly is a huge job. A tool like Microsoft Intune can really help here. It’s a cloud service that helps you manage all those endpoints from one central place.
But before you can manage anything, you have to get the devices on board. This first step, called enrollment, can seem a little tricky because there are a few different ways to go about it.
Don't worry, we've got you. This guide will walk you through exactly how to enroll a device in Intune. We'll cover the prep work, the main methods you can use, and what to do after you're set up to make that device data actually work for you.
What does it mean to enroll device intune?
So, what does "enrolling" a device actually mean? You can think of it as simply registering a device with Intune. When you do this, a special Mobile Device Management (MDM) certificate gets installed on the device. This certificate acts like a secure handshake, letting the device communicate with the Intune service.
Once that connection is established, your IT team can remotely apply security policies, deploy apps, and configure settings without ever having to physically touch the device. It’s the key to getting a clear view and control over your entire device fleet.
Before you dive in, it helps to know that the enrollment method often depends on who owns the device. Microsoft's guidance splits it into two main categories:
Corporate-owned devices: This is the equipment your company buys and owns. For these devices, IT gets full management control to configure and secure them from top to bottom.
Personal devices (BYOD): These are employee-owned phones, tablets, or laptops used for work. In this case, the focus is less on controlling the entire device and more on protecting company data within a secure "work profile," leaving personal apps and data alone.
Preparing to enroll device intune
Jumping straight into enrollment without a little prep is a recipe for a headache. Getting your foundation right first will make the whole process go a lot smoother. Here are the essential steps you shouldn't skip.
Check these prerequisites before you enroll device intune
Before you try to enroll a single device, make sure you've got these basics sorted out:
Licensing: You need a valid Microsoft Intune license for your users and devices. The good news is that it's often bundled into plans you might already have, like Microsoft 365 E3, E5, or Business Premium. If you plan on using automated enrollment, you'll also need Microsoft Entra ID P1 or P2 licenses.
MDM Authority: This one is important. You have to set your MDM authority to Intune. It’s a one-time setting in your tenant that tells Microsoft that you're using Intune to manage your devices. If this isn't set, nothing else will work.
Supported platforms: Intune works well with the latest versions of Windows, macOS, iOS/iPadOS, Android, and Linux. It's always a good idea to double-check Microsoft's official list of supported operating systems to make sure you're covered, especially if you have older devices in your environment.
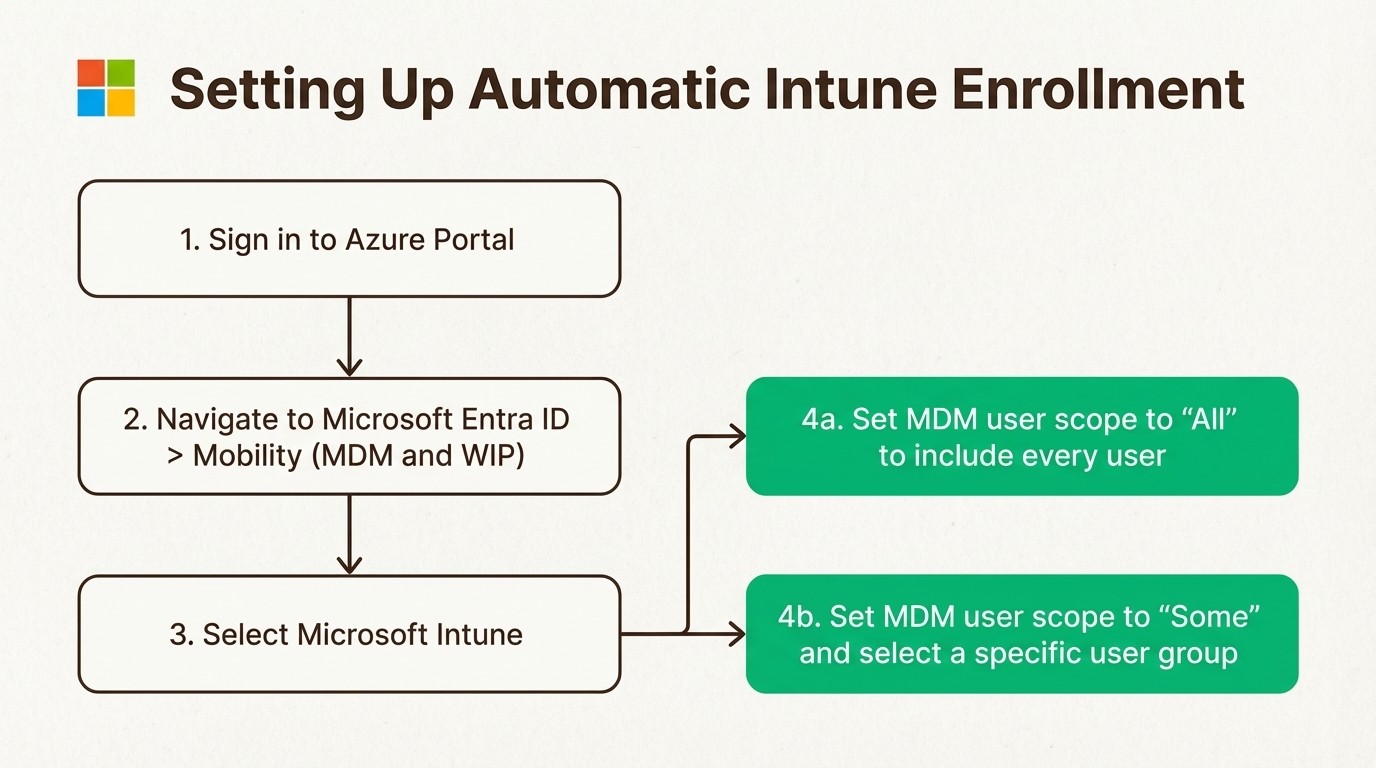
Configure automatic enrollment in Microsoft Entra ID
This is probably the most important setup step if you want enrollment to be as hands-off as possible. By configuring this, you're telling Entra ID that when a user in a specific group joins their device, it should automatically be enrolled in Intune.
Here’s a quick rundown on how to set it up, based on Microsoft's documentation:
First, sign in to the Azure portal.
Navigate to Microsoft Entra ID > Mobility (MDM and WIP), and then click on Microsoft Intune.
You'll see a setting called MDM user scope. You can set this to "All" to include everyone, or "Some" to target a specific user group. This is what gives the green light for their devices to enroll automatically.
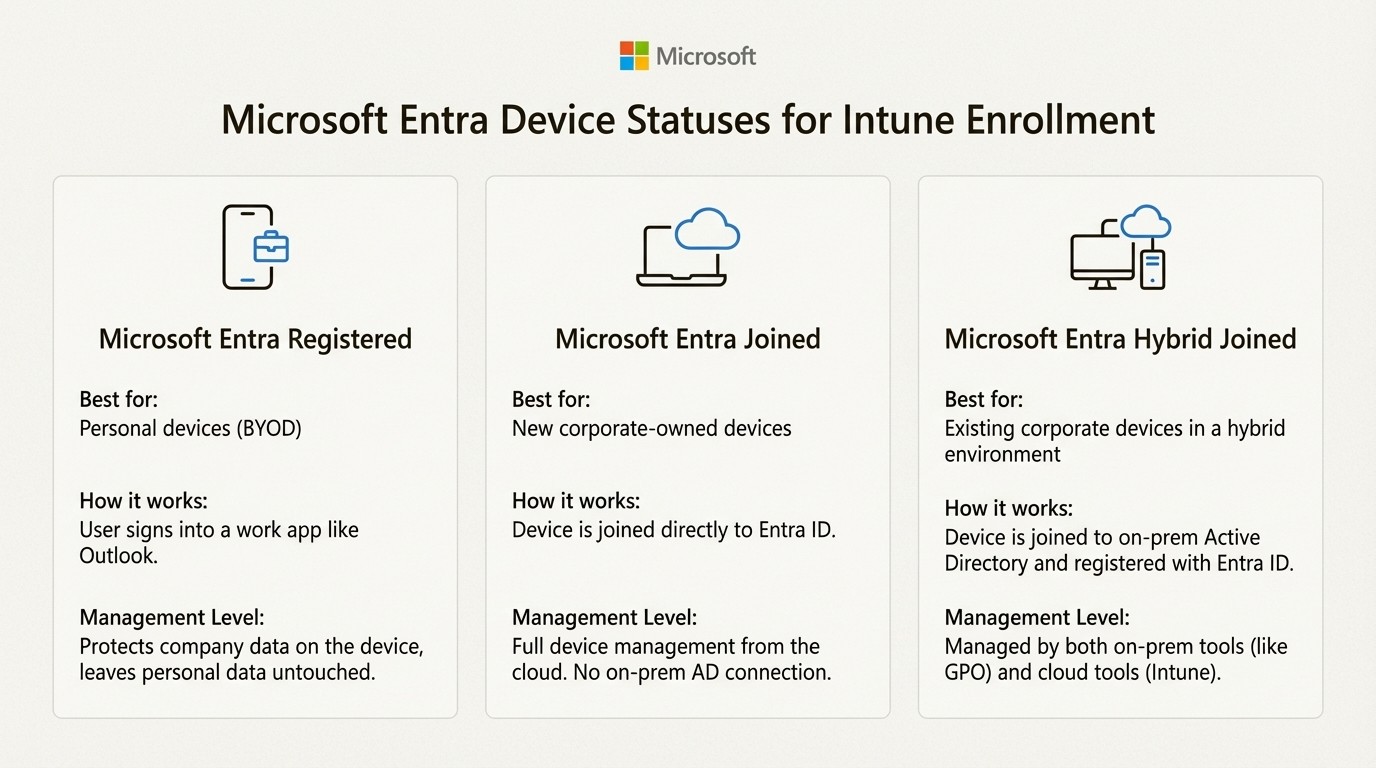
Registered vs. Joined: Understanding device status
This is a common spot where people get tripped up. The status of a device in Microsoft Entra ID affects how it's managed. Let's clear it up.
Microsoft Entra registered: This is usually for personal devices (BYOD). The user signs into an app like Outlook with their work account, which registers the device. It gives you some control over the work data on the device but doesn't manage the whole thing.
Microsoft Entra joined: This is the modern, cloud-first approach for corporate-owned devices. The device is joined directly to Entra ID and has no connection to an on-premises Active Directory. It’s managed entirely from the cloud.
Microsoft Entra hybrid joined: This is for devices that are joined to a traditional on-premises Active Directory but are also registered with Entra ID. It's a very common setup for companies transitioning to the cloud that still have a foot in their on-prem world.
Key methods to enroll device intune
Alright, with the prep work done, it's time to get down to business. The right way to enroll a device really depends on its type, who owns it, and your company's setup.
Here's a quick cheat sheet to help you choose the right path.
Enrollment Method | Best For | Device Ownership | Key Requirement |
|---|---|---|---|
Manual (Company Portal) | BYOD, one-off enrollments | Personal (BYOD) | User installs the Intune Company Portal app |
Windows Autopilot | New corporate Windows devices | Corporate | Hardware hash imported to Intune |
Group Policy (GPO) | Existing on-prem AD devices | Corporate (Hybrid) | Microsoft Entra hybrid join configured |
DEM Account | Bulk enrollment of shared devices | Corporate | Dedicated DEM user account |
Manual enrollment via the Company Portal
This is the most straightforward, user-driven method. It’s pretty simple: a user just needs to download the Intune Company Portal app from their device’s app store (Windows, Apple, or Google Play). Once they sign in with their work account, the app will walk them through the steps to enroll their Windows device.
This method is perfect for BYOD scenarios because it puts the user in control. It's also handy if you only need to enroll a few corporate devices and don't want to deal with a more complex automated setup.
Windows Autopilot for a zero-touch experience
Windows Autopilot is the best option for setting up new, corporate-owned Windows devices. It’s a collection of technologies designed to automate the Out-of-Box Experience (OOBE), so a device is ready to go with very little IT involvement.
Here’s how it works: you or your hardware vendor uploads a unique device ID, called a hardware hash, to the Autopilot service. You then assign an enrollment profile that configures all the device settings you want. When the user gets their new PC, all they have to do is unbox it, turn it on, and connect to the internet. Autopilot recognizes the device and automatically configures it and enrolls it into Intune. It’s as close to a "zero-touch" setup as you can get.
Enroll existing domain-joined devices with Group Policy (GPO)
What about all the devices you already have that are joined to your on-premises Active Directory? Wiping them all and starting over isn't practical. That’s where GPO-based enrollment is useful.
This method lets you automatically enroll your existing domain-joined PCs into Intune. According to Microsoft's guide, you just need to create a specific Group Policy Object (GPO) and enable the policy called "Enable automatic MDM enrollment using default Microsoft Entra credentials." This only works once you've set up Microsoft Entra hybrid join, which connects your on-prem AD with Entra ID.
Bulk enrollment with a Device Enrollment Manager (DEM) account
Sometimes, you need to enroll a whole bunch of devices at once without tying each one to a specific user. Think of shared tablets in a retail store or a cart of laptops in a school. For this, you can use a Device Enrollment Manager (DEM) account.
A DEM is a special Intune account that's not tied to an administrator. A single DEM account can enroll up to 1,000 devices, making it perfect for large-scale deployments where devices are set up by IT before being handed out.
Seeing these methods in action can make them easier to understand. For a detailed visual walkthrough of the different ways to register devices in both Microsoft Entra ID and Intune, check out this step-by-step guide:
This video offers a detailed visual walkthrough of the different ways to register devices in both Microsoft Entra ID and Intune.
After you enroll device intune: Turn your data into an asset
Getting hundreds of devices enrolled in Intune is a huge win, but it's really only half the battle. You now have a ton of valuable device data, but it's sitting in the Intune portal, completely separate from where your IT support team actually works.
Think about it. A support ticket comes into Jira saying, "My laptop is slow." The agent has to stop what they're doing, open a new browser tab, log into the Intune portal, search for the user or device, and then manually copy-paste the information back into the ticket. This constant context-switching is a huge time-waster. In fact, support teams can burn up to 45 minutes per ticket just hunting for this kind of basic device info.
Why syncing data is critical
When your device management tool (Intune) and your service management tool (Jira) don't talk to each other, you're left with disconnected systems. You don't have a single source of truth for your IT assets.
This gap leads to slower ticket resolution times, inconsistent data, and a lot of frustration for both your IT staff and your end-users. You can't easily see a device's full ticket history, so you don't know if that "slow laptop" is a brand-new machine with a software issue or a four-year-old clunker that's long overdue for a replacement.
Creating a single source of truth in Jira
The solution is to bring your Intune data directly into your asset management system inside Jira.
An integration tool like Asset Management for Jira is built for this. It has a powerful, native integration that automatically syncs all your enrolled devices, users, and their assignments from Microsoft Intune into Jira.
Instead of flipping between tools, your support team gets a complete, up-to-date profile of a user's devices right inside the Jira ticket they're working on. They can see the model, serial number, OS version, and more, all in one place. This context turns troubleshooting from a time-consuming scavenger hunt into a streamlined, efficient process. It's how teams are able to resolve tickets 34% faster.
From learning how to enroll device intune to managing assets intelligently
Getting your devices enrolled in Intune is a critical first step toward modern endpoint management. Whether you’re using Autopilot for new corporate devices, GPO for your existing fleet, or the Company Portal for BYOD, choosing the right method is key to getting started on the right foot.
But remember, enrollment is just the beginning. The real value comes when you make that device data accessible and actionable where your IT team lives every day: your service desk. By connecting Intune to Jira, you break down data silos and empower your team to solve problems faster and more effectively.
Once your devices are enrolled in Intune, take the next step to improve your IT support. Connect Intune to Jira with a tool built for seamless integration. Start a free trial of Asset Management for Jira and see how much faster your team can resolve tickets when they have all the asset information they need at their fingertips.


