Jamf Pro + Jira: Complete asset management integration guide
This guide walks you through three ways to connect Jamf Pro with Jira, with step-by-step instructions for the most straightforward approach. Whether you're running Jira Cloud or Data Center, you'll find an integration path that fits your setup.

Colin Reed
IT Expert and Content Writer
Last Updated

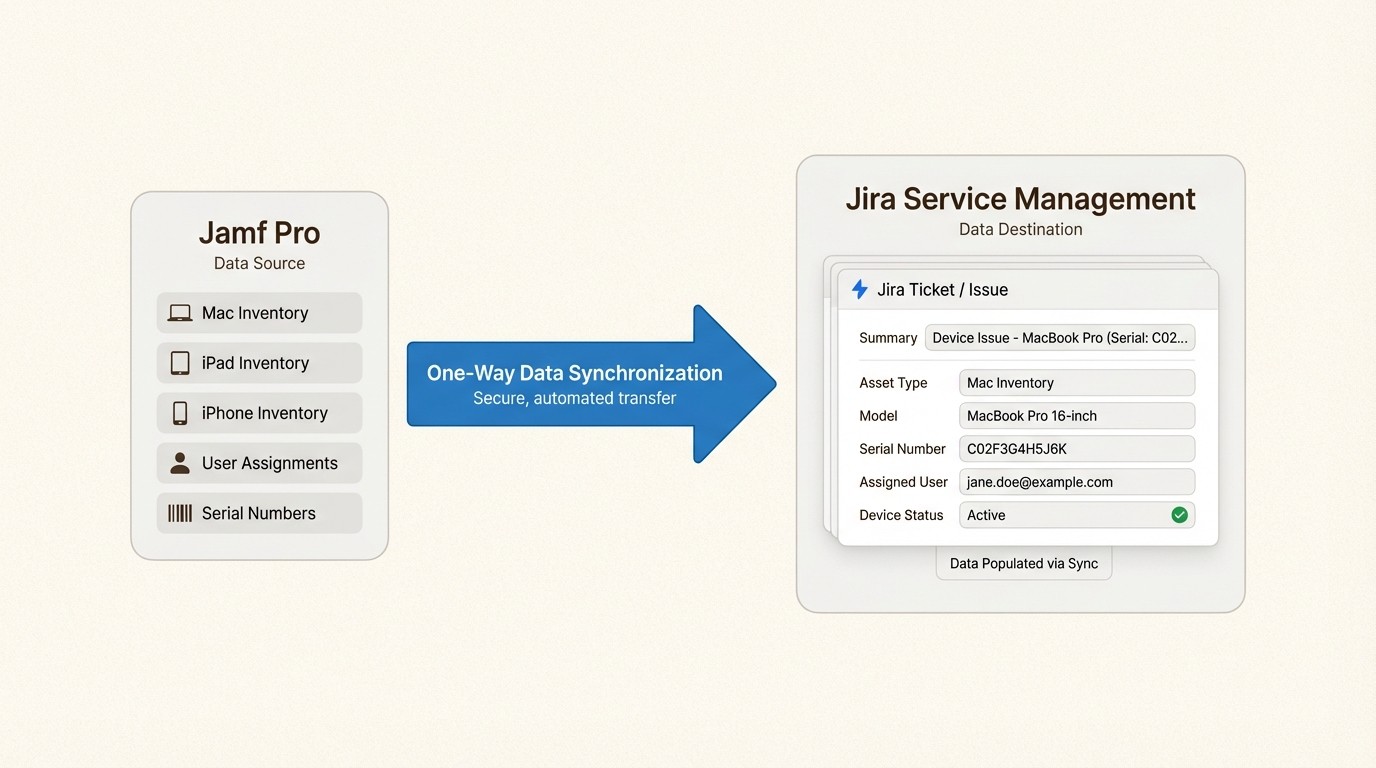
If your IT team manages Macs, iPads, and iPhones, you already know Jamf Pro keeps those devices configured and secure. But when someone submits a support ticket asking about their laptop, can your help desk instantly see which device they have, when it was purchased, and what software is installed?
Integrating Jamf Pro with Jira gives you a single source of truth. Instead of your asset data living in one system and support tickets in another, everything connects. When a user reports an issue, the technician sees their complete device history without asking basic questions like "what's your serial number?"
This guide walks you through three ways to connect Jamf Pro with Jira, with step-by-step instructions for the most straightforward approach. Whether you're running Jira Cloud or Data Center, you'll find an integration path that fits your setup.
What you'll need
Before starting, make sure you have:
A Jamf Pro subscription (cloud or on-premise)
Jira Cloud or Data Center with admin access
Roughly 30-60 minutes for initial setup
A clear idea of which devices and data you want to sync
You'll also need to decide which integration approach makes sense for your organization.
Choosing your Jamf Pro Jira integration approach
Three main solutions connect Jamf Pro to Jira, and the right choice depends on your Jira version, budget, and how complex your asset management needs are.
Option 1: JSM Assets with Jamf Integration (Data Center only)
Atlassian's native asset and configuration management solution includes a free Jamf integration app for Data Center deployments. It's a full CMDB (configuration management database) with dependency mapping and impact analysis.
Best for: Large enterprises already paying for JSM Premium ($47/agent/month) who need enterprise CMDB capabilities.
Limitations: The Jamf integration app only works on Data Center, requires JSM Premium licensing, and has a steep learning curve. With only 67 installs, it's a niche solution.
Option 2: Jamf Importer for JSM Assets (Cloud)
Built by Pio as a Forge app, this imports Mobile Devices, Computers, Applications, Licensed Software, Certificates, Users, and Buildings from Jamf Pro into JSM Assets. It claims setup takes less than 5 minutes.
Best for: Cloud users who want full CMDB features with quick deployment.
Limitations: Cloud only, requires JSM Premium, and pricing isn't publicly listed (commercial license via Atlassian).
Option 3: Asset Management for Jira (Cloud)
Asset Management for Jira takes a simpler approach. Instead of a full CMDB, it provides practical asset tracking with strong Jamf sync, QR code support for physical audits, and direct ticket linking. It's a Gold Marketplace Partner app with 2,000+ installs.
Best for: Teams wanting quick setup without CMDB complexity, especially those with 10-500 employees.
Pricing: $10/month for up to 10 users, then from $2.85/user/month. Includes unlimited assets and all integrations.
For most organizations, Option 3 hits the sweet spot of functionality and simplicity. The rest of this guide focuses on that approach, though the Jamf API setup steps apply to any integration.
Step 1: Configure Jamf Pro API access
Every integration starts with creating API credentials in Jamf Pro. Here's how to set that up.
First, log into your Jamf Pro dashboard and navigate to Settings > System Settings > API Roles & Clients.
Create a new API Role with these minimum privileges:
Read Computers
Read User
Read Mobile Devices
These permissions let Jira pull device inventory, user assignments, and mobile device data. The integration only reads data, it doesn't write changes back to Jamf.
Next, create an API Client that uses this role:
Go to Settings > System Settings > API Roles & Clients
Click New to create an API Client
Select the API Role you just created
Save the client
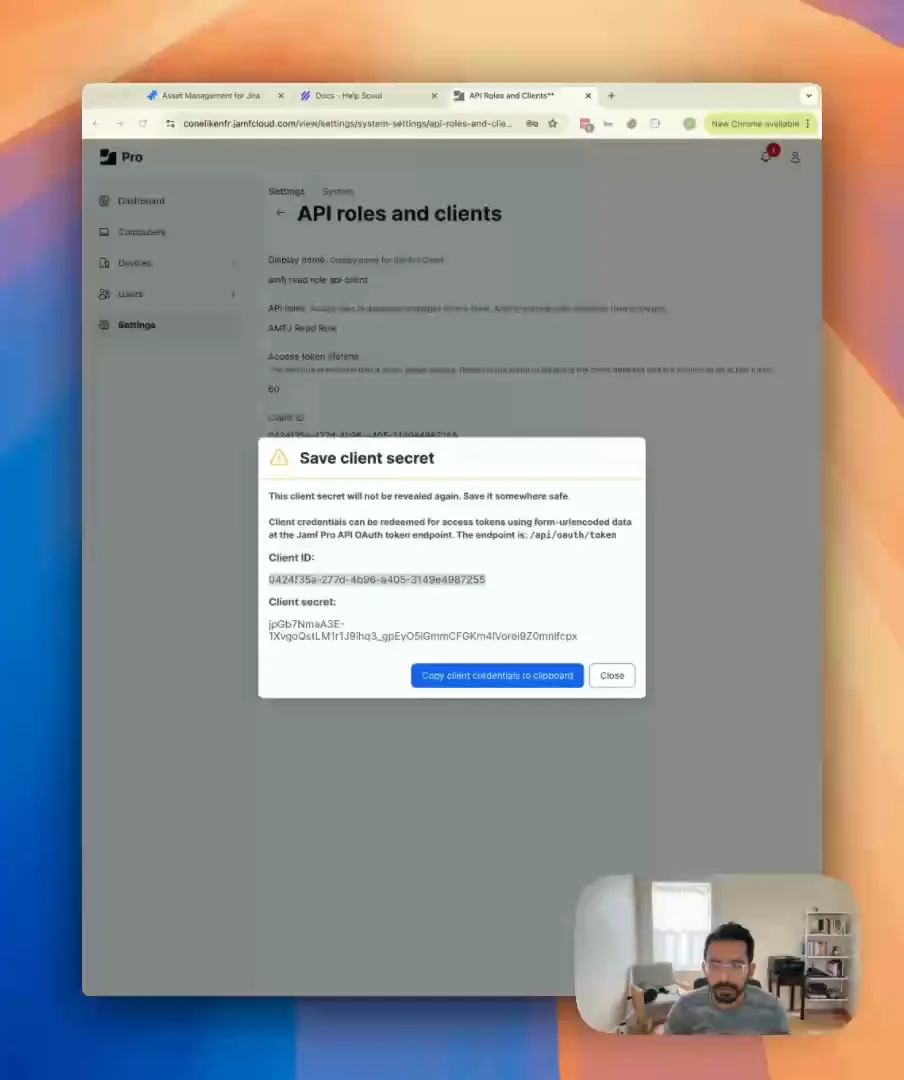
Click Generate Client Secret
Copy both the Client ID and Client Secret (you'll need these in Jira)
Store these credentials securely. The Client Secret is shown only once, if you lose it, you'll need to generate a new one.
Step 2: Set up your Jira asset schema
Before connecting Jamf, prepare your Jira asset structure. In Asset Management for Jira, this means creating or selecting the asset types where Jamf data will land.
The app creates default asset types for Computers and Mobile Devices, but you should review and customize them to match your needs:
Computers: Typically includes Macs and any Windows devices managed by Jamf
Mobile Devices: iPhones, iPads, and Apple TVs
Users: The people assigned to those devices
For each asset type, consider which attributes you want to track:
Attribute | Source in Jamf | Use Case |
|---|---|---|
Serial Number | General > Serial Number | Warranty lookups, unique identification |
Model | Hardware > Model | Replacement planning, standardization |
OS Version | Operating System > Version | Compatibility checks, update campaigns |
Last Check-in | General > Last Contact | Identifying inactive devices |
Assigned User | User and Location > Username | Support ticket linking |
Purchase Date | Purchasing > Purchase Date | Depreciation, lifecycle planning |
Warranty Expires | Purchasing > Warranty Expires | Renewal planning |
Step 3: Configure the integration and map your data
Now connect the two systems. In Asset Management for Jira:
Go to Settings > Integrations
Find Jamf and click Connect
Enter your Jamf Pro URL (for example:
https://yourcompany.jamfcloud.com)Paste the Client ID and Client Secret from Step 1
Click Save
The app will test the connection and start syncing within minutes. For initial setup, you can trigger a manual sync to see results immediately.
Field mapping specifics
The integration automatically maps standard Jamf fields to Jira asset attributes. Review these mappings to ensure they match your schema:
Computer mapping defaults:
Jamf "name" → Asset "Name"
Jamf "serialNumber" → Asset "Serial Number"
Jamf "model.name" → Asset "Model"
Jamf "operatingSystem.version" → Asset "OS Version"
Jamf "hardware.processorSpeed" → Asset "Processor"
Jamf "hardware.totalRam" → Asset "Memory"
Jamf "lastContactTime" → Asset "Last Check-in"
User mapping defaults:
Jamf "username" → Asset "Username"
Jamf "realname" → Asset "Full Name"
Jamf "email" → Asset "Email"
Jamf "phone" → Asset "Phone"
If you use custom extension attributes in Jamf (for example, to track department codes or cost centers), you can map those to custom fields in your Jira asset schema.
Sync scheduling
Choose how often data updates:
Real-time: Best for fast-changing environments (triggers on Jamf webhook events)
Hourly: Good balance for most organizations
Daily: Sufficient for stable environments with infrequent changes
The sync is one-directional: Jamf → Jira. Changes made in Jira don't write back to Jamf, which prevents accidental modifications to your MDM records.
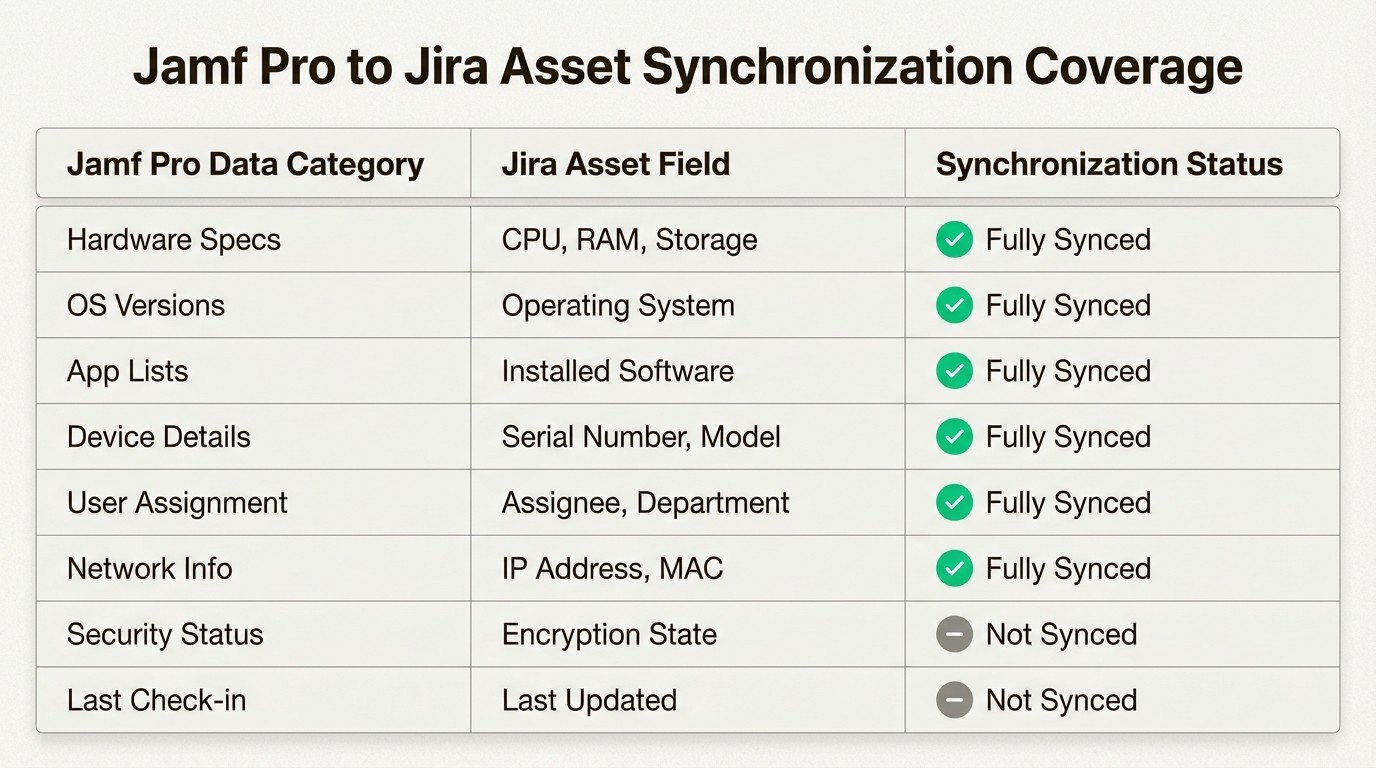
What data syncs from Jamf Pro
Understanding exactly what transfers helps you set expectations and plan your asset workflows. The integration pulls:
Computer inventory:
Hardware details (model, processor, memory, storage)
Operating system and version
Serial number and asset tag
Last check-in time and IP address
Installed applications and versions
Configuration profiles
Extension attributes
Mobile devices:
Device model and capacity
iOS/iPadOS version
Serial number and IMEI
Last inventory update
Installed apps
Compliance status
User information:
Username and full name
Email and phone
Department (if populated in Jamf)
Building and room (if populated)
Assignment data:
Which user has which device
Assignment history
Device status (active, inactive, unmanage)
This data gives you complete asset visibility without manual data entry. When someone opens a support ticket, the technician sees their assigned devices instantly.
Best practices for ongoing management
Setting up the integration is just the start. Here's how to keep it running smoothly.
Schedule regular sync audits. Monthly, spot-check a few devices to confirm data accuracy. Compare Jamf records to what's showing in Jira. Catching discrepancies early prevents bigger problems later.
Handle device retirements properly. When a device reaches end-of-life, don't just delete it from Jamf. Update its status in your asset management system to "retired" or "recycled." This preserves historical records for compliance and auditing. Maintaining proper asset records helps with equipment recovery and accountability.
Set up automated workflows. With asset data in Jira, you can create automation rules like:
When a ticket mentions "laptop replacement," check device age and warranty status
If a device hasn't checked in for 30 days, create a task to verify its location
When onboarding a new employee, automatically assign available inventory
Create asset dashboards. Build Jira dashboards showing:
Devices nearing warranty expiration
Computers running outdated OS versions
Unassigned inventory available for deployment
Asset value by department
Maintain data hygiene. Jamf is your source of truth for device data, but it only knows what you tell it. Keep purchase dates, warranty information, and user assignments current in Jamf, and those updates flow automatically to Jira.
Troubleshooting common Jamf Pro Jira integration issues
Even straightforward integrations hit snags. Here are fixes for the most common problems.
API connection failures. If Jira can't connect to Jamf, verify:
The Jamf Pro URL is correct (include
https://)The API Client hasn't been deleted or disabled in Jamf
Your Jamf instance allows API connections from Jira's IP ranges
The Client Secret hasn't expired (Jamf secrets can have expiration dates)
Authentication errors. "401 Unauthorized" typically means:
The API Role lacks required privileges (double-check Read Computers, Read User, Read Mobile Devices)
The API Client is associated with the wrong role
The Client ID or Secret has a typo (they're case-sensitive)
Missing devices in sync. If some devices don't appear:
Check if they're excluded by your sync filters (some integrations filter by site or department)
Verify the devices are actively managed in Jamf (not unmanaged or deleted)
Confirm the devices have checked in recently (very old inactive devices may be filtered)
Field mapping mismatches. When data appears in the wrong fields:
Review your attribute mapping configuration
Check if custom extension attributes in Jamf have changed names
Verify field types match (text fields can't receive date values, for example)
Sync schedule problems. If data feels stale:
Check your sync frequency settings
Look for sync job errors in the integration logs
Verify Jamf's API isn't rate-limiting your requests
Getting started with your Jamf Pro Jira integration
You don't need to tackle everything at once. Here's a practical rollout plan:
Week 1: Set up the API connection and sync computers only. Get familiar with the data flow and field mappings.
Week 2: Add mobile devices and users. Train your support team on viewing asset data in tickets.
Week 3: Build your first asset dashboard and automation rules. Start tracking key metrics.
Month 2: Refine field mappings based on feedback, add custom attributes, and document your processes.
For most organizations, the entire setup takes a few hours of configuration plus ongoing maintenance. The time savings come quickly: technicians stop asking basic device questions, asset lookups happen in seconds, and you finally have that single source of truth.
If you're ready to connect Jamf Pro to Jira, start a free 30-day trial of Asset Management for Jira. The Jamf integration is included at every pricing tier, and you can have your first devices syncing within minutes of installation.
Frequently Asked Questions
How much does it cost to integrate Jamf Pro with Jira?
Costs vary by approach. Asset Management for Jira starts at $10/month for small teams. JSM Assets requires Premium licensing at $47/agent/month. The Jamf Importer for JSM Assets is a paid commercial app with custom pricing.
Can I integrate Jamf Pro with Jira Cloud, or is it only for Data Center?
You can integrate with both. Asset Management for Jira and Jamf Importer for JSM Assets work on Cloud. The native Atlassian Jamf Integration app is Data Center only.
How often does the Jamf Pro Jira integration sync data?
Most integrations offer configurable sync schedules ranging from real-time (webhook-driven) to daily. Asset Management for Jira defaults to hourly syncs, which balances freshness with API load.
What happens to asset data when a device is retired from Jamf?
Best practice is to update the device status in your asset management system rather than deleting the record. This preserves historical data for compliance and auditing while clearly marking the device as inactive.
Do I need a Jamf Pro administrator to set up the integration?
Yes. Creating API roles and clients requires Jamf Pro administrator access. If you don't have admin rights, you'll need to coordinate with someone who does to complete Step 1 of this guide.
Can I sync custom fields from Jamf Pro into Jira?
Yes. Most integrations support Jamf extension attributes. In Asset Management for Jira, you map extension attributes to custom asset fields during the configuration step.


